 40G/100G Optical Transceivers
 10G/25G Optical Transceivers
 155M/622M/2.5G Optical Transceivers
 100M/1G Optical Transceivers
 FC 16G/32G Optical Transceivers
 CWDM/DWDM Optical Transceivers
 100M/1G/10G Coppers
 Active Cable AOC
 Direct Attach Cable DAC
 Regular/MTP-MPO Fiber Patch Cords
 MT2011
 MT2010
 CodingBox
CISCO N9K-C93180YC-EX NXOS System Switching ACI System Guidelines
Time: 2024-11-06
I. Preparation before upgrading
1. U-Disk(Usb2.0,File system format is FAT32);
2. ACI system image;
3. console cable;
4. switch (CISCO N9K-C93180YC-EX switch), computer.
II Precautions
1. To avoid damaging the device, do not interrupt the switch power supply during the system image update.
2. Before updating the system image, please make sure whether the device supports ACI system, you can check the list of hardware that supports ACI system in the release file on the ACI image download page.
III Switching Steps
1. Put the ACI system image into the USB flash disk.
• Store the switch system image in a USB flash disk.
• Insert the USB flash drive into the USB port of the switch.
• Determine the name of the system image file stored on the USB flash drive with the file suffix bin.
2. In privileged mode, use the copy usb2:aci-n9000-dk9.15.2.7g.bin bootflash:aci-n9000-dk9.15.2.7g.bin command to upload the image from the USB flash drive to the switch (the ACI system image file name is aci-n9000-dk9.15.2.7g. bin). You can use the dir command to view the uploaded system image.
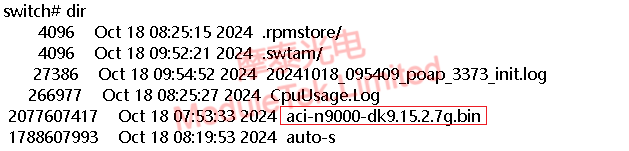
Figure 1 Viewing internal switch files
3. In global configuration mode, use the following command to ignore the NXOS boot image.
no boot nxos
copy running-config startup-config
4. In global configuration mode, enter boot aci bootflash:aci-n9000-dk9.15.2.7g.bin to set the ACI image as the image source after reboot, and enter y to confirm after executing the command (note that the switch configuration cannot be saved after the execution of this command), and the switch starts to convert the system after reboot.
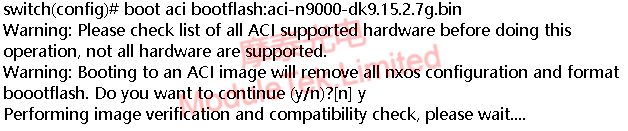
Figure 2 Set ACI mirror as the mirror source after reboot
5. Use the show version command to verify whether the system is the ACI version after the switch finishes booting.
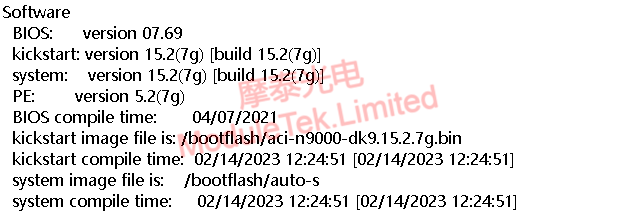
Figure 3 The switch is currently running system software
Recovering the NXOS System
The above operation converts the system of CISCO N9K-C93180YC-EX switch to an ACI version system. If you need to recover the system back to the NXOS system, you can follow the steps below.
1. Reboot the CISCO N9K-C93180YC-EX switch, and press CTRL+C to interrupt the boot process during the reboot process and enter loader mode. Use the dir command in this mode to see the NXOS image file in bootflash:: of the switch.
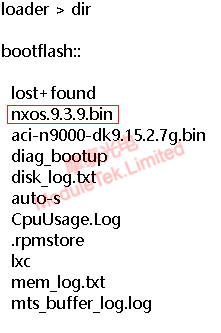
Figure 4 Viewing the internal files of the switch in loader mode
2. Use the boot nxos.9.3.9.bin command to start the NXOS image (here the NXOS image file takes nxos.9.3.9.bin as an example), and the switch starts to recover the NXOS system.
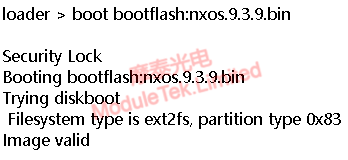
Figure 5 Start NXOS image in loader mode
3. After the switch is booted, use show version to check the system version of the switch, and you can see that the system has been successfully restored to the NXOS version. Set the switch password and boot image as NXOS and save the configuration (you can refer to the Cisco C93180 switch upgrade guide for this part) to complete the recovery of the NXOS system.
Figure 6 View switch version
Moduletek Limited can provide optical module products compatible with CISCO switches.
If you have any questions about the above content, you can contact us by Email : web@moduletek.com
If you have any questions about the above content, you can contact us by Email : web@moduletek.com


