Guidelines for upgrading Aruba 8320 Switch system software version using USB
Time: 2022-05-24
Optical modules are generally used in switches, NICs, routers, and other communication devices, and the related system software of these devices is constantly iterating to fix known problems or expand application functions. Users can choose the switch system software version provided by the host manufacturer according to their own needs when using the switch. Different software versions may have different requirements on the compatibility of optical modules, and by switching the switch system software version, some module compatibility problems can be found or solved in order to improve the module's adaptability in the host.
Below is the method of upgrading the system software of Aruba switch using USB according to specific cases:
I. A information / material preparation
1. U.S.D(Usb2.0,file system format is FAT32);
2. Switch system software (recommended to download from the official website: www.hpe.com/support/downloads );
3. network cable;
4. switch (Aruba 8320 JL479A), computer;
II Precautions
1. To avoid damaging the device, do not interrupt the power supply of the switch during the software update.
2. Before updating the software, make sure that the downloaded software version supports the switch model that needs to be upgraded, and the software download page usually has information about the system software description.
III. Upgrade Steps
1. Set USB as available status
Store the switch system software in a USB flash disk.
Insert the USB flash disk into the USB port of the switch.
Determine the name of the software file stored on the USB flash drive.
Enable USB on the switch with the following command reference.
switch>enable //enter privileged mode
switch#config t //Enter global configuration
switch(config)#usb //enter USB
switch(config)#do usb mount //enable USB
switch(config)#do show usb //check USB status
Enabled : Yes
Mounted : Yes
2. Copy the system software file to the switch (the system software version file takes ArubaOS-CX_8320_10.05.0011.swi as an example)
switch#copy usb:/ArubaOS-CX_8320_10.05.0011.swi secondary //copy the system software from USB to the switch
Explanation: Aruba switch allows to save 2 system software, i.e. there are two locations to choose from: primary and secondary (primary and secondary), users can just choose to start the system software according to the saving location;
3. Check the uploading of system software files
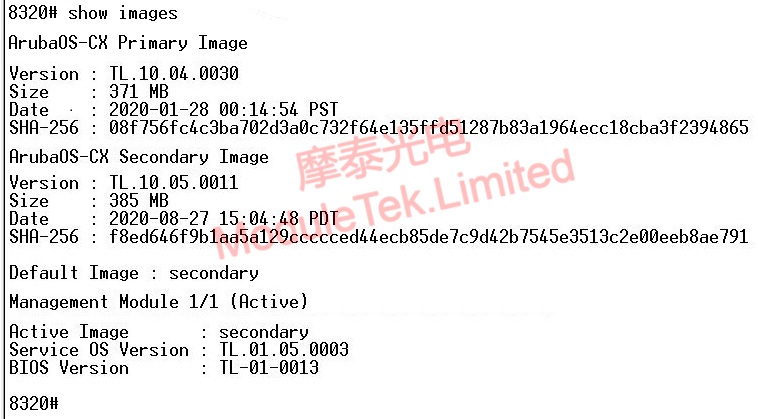
switch#show image //check the system software file information in the switch to confirm the success of this system software transmission
Note: The previous step will store the system software in secondary, here you can check and confirm in Secondary Image.

Figure 1 Check the system software stored in the switch
4. Switch the default boot system software version of the switch
switch#boot system Secondary //Select the default boot version according to the location of system files in the switch: primary/secondary/serviceos, corresponding to step 2
5. Reboot the switch to verify the current settings
switch#reboot //Use the command to reboot the switch
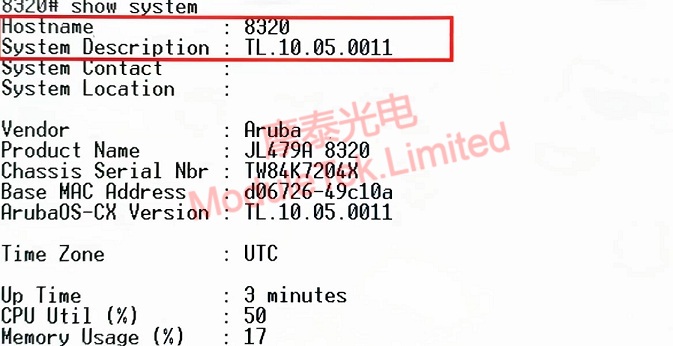
6. After reboot, check the current system software version of the switch
switch#show system //View the system software running on the switch

Figure 2 Currently running system software of the switch
Moduletek Limited can provide 1G and 10G compatible optical modules supported by different Aruba switch system software versions.
If you have any questions about the above content, you can contact us by Email : web@moduletek.com

 40G/100G Optical Transceivers
 10G/25G Optical Transceivers
 155M/622M/2.5G Optical Transceivers
 100M/1G Optical Transceivers
 FC 16G/32G Optical Transceivers
 CWDM/DWDM Optical Transceivers
 100M/1G/10G Coppers
 Active Cable AOC
 Direct Attach Cable DAC
 Regular/MTP-MPO Fiber Patch Cords
 MT2011
 MT2010
 CodingBox


